|
Recovering from an injury can be a nuanced process - there are some symptoms that you should listen to and others that aren’t so important, poor information abounds during searches on Dr. Google, there are friendly recommendations to try certain products, drugs or stretches, and just when you think it is okay to resume your normal activities pain may re-surge. It can be confusing… That being said, if you focus your attention on the overarching principles of an effective rehab, recovery doesn’t have to be complicated! Here are few key areas that anyone can assess and will help to simply your return to wellness: 1. Time A) If you’ve sustained an injury, rehab will take time. Determining its severity can help you plan your rehab timeline. If it’s a small injury (micro-tearing or grade 1 sprain/strain), allow three days of relative rest for the injured area and slowly start to return to your sport. If it was a moderate or severe injury (grade 2-3 sprain / strain, fracture), you will need more time to allow the injury’s wound margins to heal back together. Due to the magnitude of a more severe injury you will likely benefit from a support (see below) and clever ways of modifying activity/programming. B) If you are not seeing many signs of improvement from your injury within a week, consulting a health care provider (Physio/Doctor) is a good idea. Diagnosing the injury and its severity will be important for your rehab strategy and long-term success. 2. Exercise A) Make sure that you perform exercises specific for your injury/dysfunction. Your exercises should address all three of the following:
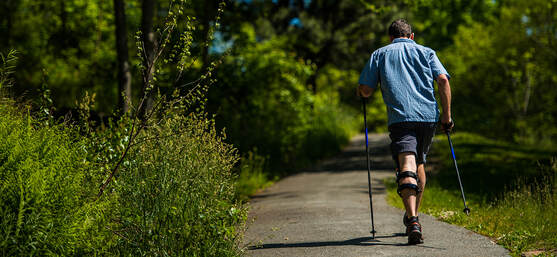
3. Supports A) Your recovery from an injury may be uncomfortable but it needn’t be exquisitely painful. Utilizing walking aids (crutches/cane/walking poles), braces, taping techniques, medication (oral, topical or injections) or certain types of shoes/orthotics may help to alleviate some of your pain. These supports are not be relied on for very long, but can help reduce the harmful effects of feeling too much pain during your recovery. 4. Activity level A). Many of my clients see me because they have slow progress or are seeing no progress. This is often because #2 is not being addressed and clients are often doing too much or too little activity in their day to day life. Determining the appropriate amount of activity requires:
Concluding Remarks Creating a good rehab program is an art. Of course there are other items to consider whilst recovering from an injury, but if you can dial in these four key areas it should help with setting realistic expectations and executing a planned recovery.
As always, if you have any questions feel free to send me an email or leave a comment!
2 Comments
While manual therapy and education may play a crucial role in injury rehabilitation, injuries and pain respond the best in the long-term to progressive loading through exercise. In fact, exercise is said to be "the closest thing to a miracle cure" (1), and is widely accepted as the means through which you can attain complete recovery. Prescribing exercise can be intimidating for some therapists, so I wanted to provide some facts and guidelines that may help make this easier! Fitting the Diagnosis to the Injury Attaining an accurate diagnosis CAN be difficult, but is often the first stage to developing a treatment plan, including exercise. 1. Do we know the actual pathology/diagnosis? An over-reliance on imaging and unreliable ‘special’ tests may mean that the true pathology (AKA reason for the client’s pain) may not fully be understood. A) Imaging typically looks at the injury site at a specific moment in time. To develop a true understanding of the pathology, this information must be examined along with the patient's subjective history and movement patterns. A common example in knee pain would be that an x-ray finding of moderate osteoarthritis of the patella is an additional finding, when the true reason for the patient's knee pain is trigger points in the quadriceps caused by suboptimal movement control. B) Many Special Tests are not that special. A special test should look to confirm suspicions of a specific diagnosis - they should not be used initially when developing a diagnosis. We know that many special tests lack sensitivity and specificity, and as a result are not helpful in confirming the diagnosis (even with a proper history and objective exam). Nicklaus Biederwolf, a physiotherapist and researcher, has this to say about special tests specific to the shoulder: "A great lack of consistency with regard to how, when, and what special tests to use in clinical examination for shoulder differential diagnosis is evident" (2). C) Different health care practitioners may develop different diagnoses that fit the information gathered during their assessment, and their bias. It is important to do a comprehensive assessment (including the client's previous medical history, mechanism of injury, pattern of pain, global movement patterns, and a specific joint/tissue/nervous system/vascular assessment). 2. Without imaging, we depend on clinical patterns to develop an accurate diagnosis, however similar pathologies may behave differently in the clinical setting. For example a partial thickness supraspinatus tear (one of the shoulder's rotator cuff muscles) may behave differently in one client versus other clients - and this may be for a wide variety of reasons: A) Anatomical variations: The acromion (a protrusion on our shoulder blade, under which the supraspinatus tendon glides) come in all shapes and sizes. The same applies to the rest of our bones, and muscles/tendons in our body - we are not as symmetrical and standardized as you may think! B) Regional Interdependence: Canadian Physiotherapists are known as 'The Movement Specialists' (3), so keep connecting the dots to determine how one area of the body may be affecting another! The thoracic spine, neck, scapula and all of its connecting muscles and ligaments alter the dynamic control and posture of the shoulder, which ultimately impact the supraspinatus tendon. C) Variations in nociception (sensing pain): Fewer pain nerve endings near the injury site, previous injury to nerve or blood supply at the area, or differences in central nervous system perception of pain on a global level will affect how a patient feels potentially harmful stimuli. D) Multiple injuries: A mechanism of injury that may tear the supraspinatus may also injure other tissues in the area. For example, there could also be an injury of the labrum, chondral surface of the humerus, biceps tendon, pec major, or subacromial bursa. It is nearly impossible to identify/distinguish all of these pathologies in the clinic without imaging... BUT does it really matter? Read on! What To Do.. in a World of Unknowns? It can all get quite confusing.. The items above paint a muddled picture: It can be quite difficult to come up with the correct diagnosis due to many(!!!) factors. Luckily, despite this fact, there are a few things we can do that will promote successful recovery. 1. It may be more important to focus on movement deficits first. Our bodies are exceptional at healing themselves. In fact, the best athletes in the world are the ones that recover the quickest (from training, games, or injuries). Most of the time, the injured tissue will heal on their own, but will leave us with tight muscles and poor movement patterns as a result of compensation. This means that pursuing imaging and specialist appointments may just end up being a waste of time, health care dollars, and stress. To start, the patient shoulder obtain a couple of opinions (physician and physiotherapist) to determine whether medical testing may be needed. Following these opinions, it is usually best to focus on improving flexibility and movement control. 2. Zoom out; Broaden your perspective! Often we warn patients against performing certain exercises, based on the fact that they have a certain pathology (e.g. with an acute partial tear of the supraspinatus tendon, stay away from dips or deep bench press). Take a step back and look at global movement patterns - are there any other restrictions / dysfunctions that you could work on first? In our case example: Do you need to work on thoracic mobility, activating scapular upward rotators, releasing scapular downward rotators, activating deep neck flexors, releasing posterior rotator cuff, releasing adhesions at the interface of pec major / supraspinatus / long head of biceps? Maybe a further step back would even suggest asymmetries in lower body, lower back, or neck strength/mobility. 3. Prescribing the exercise. Suggesting that the patient does a specific exercise is not enough. Ensure that the correct exercise is performed correctly; Spend time on coaching form and don’t expect that your client knows how to do the exercise properly. Lastly, discuss the importance of correct exercise: 1. Volume 2. Intensity 3. Rest 4. Tempo By changing these four variables, we can ultimately train the tissue work for its intended purpose and improve A) Muscular endurance B) Muscular power C) Muscular reactivity (plyometrics) D) Tendon loading capacity 4. Test, and Re-Test If you've taught the exercises well, allow adequate time for a beneficial result to occur, and re-test the client's functional deficits. 5. Lastly, a client’s most effective exercises may change overtime due to movement quality, tissue quality, perceived effort/challenge, ability to recover quickly, or the applicability to sport and life specific challenges. Follow up a few weeks or months down the road to provide the best possible care to your client. References (1) Academy of Medical Royal Colleges. Exercise: The miracle cure and the role of the doctor in promoting it. AOMRC.org.uk. 2015 Feb
(2) Biederwolf, Nicklaus E. "A proposed evidence-based shoulder special testing examination algorithm: clinical utility based on a systematic review of the literature." International journal of sports physical therapy 8.4 (2013): 427. 3) Physiotherapy Alberta: About Physiotherapy. Accessed February 1, 2018. https://www.physiotherapyalberta.ca/public_and_patients/about_physiotherapy History of Knee Pain It's about this time of year, every year, that people living in north of California think about strapping on skis for the winter. The most common concern is regarding knee integrity and readiness to ski. I like to group the concern into three groups:
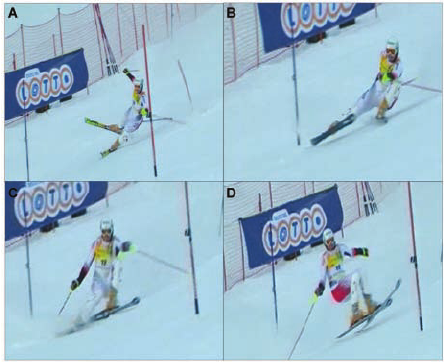
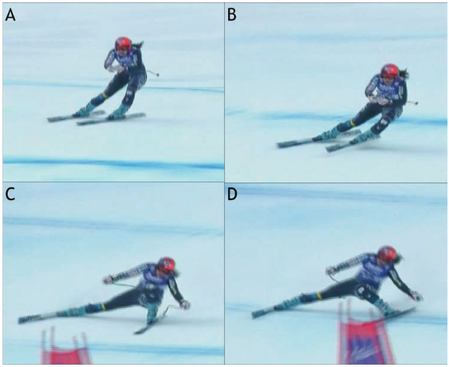
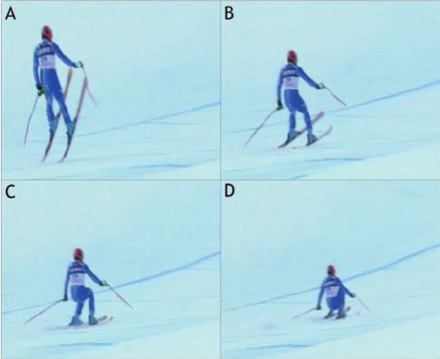
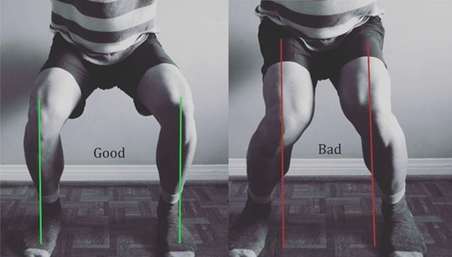
Chances are that if you fall into group 3, you will likely ski and have an injury-free season (but unfortunately there is always a first time for everything…). If you fall into group 1 or 2, you’ll likely appreciate the remainder of the article. Knowledge is power – use the following information to shape your training and awareness! Mechanism of Ski Injuries Fact The knee has two joints – the tibiofemoral joint and the patellofemoral joint. Skiing loads both joints tremendously, in different ways. The two most common knee injuries from skiing include ACL (anterior cruciate ligament) tears, and patellofemoral dysfunction (knee cap pain). ACL Tears ACL tears are acute, and often a result of catching an edge, crashes or poor landings. They often fall into one of three categories: 1) Slip Catch: Commonly seen while turning when the inside edge of the outer ski catches the snow surface, forcing the knee into a valgus collapse and internal rotation position (2). 2) Dynamic Snow Plow: When one of the ski edges accidentally engages the inside edge of the skis, and forces the lower leg to jerk inwards (valgus collapse). The tibia rapidly moves across the middle of the body and cause the valgus collapse of the knee. (1). 3) Landing Back-Weighted: A tactical error in jumping / landing and technique that leads to landing on the tails of the ski, which will stress the knee joint in an anterior/posterior shearing nature (1). Patellofemoral Pain Patellofemoral pain often comes on from an accumulation of poor or excessive loading. The most common fault (and easiest to identify) is a valgus collapse of the knee. You can also identify this by watching someone squat or lunge, or squat / jump, as seen below. If the knee has a tendency to collapse inwards, the hip is usually doing a poor job stabilizing the knee. Other possible reasons for patellofemoral pain include overuse of the quads (anterior chain dominance, too much skiing too soon), tight quads (causing compression of the patella) or weak quads (causing poor stabilization of the knee cap for the load being placed). Training for Healthy Knees and an Injury-Free Ski Season An entire training program for proper knee function is outside of the scope of this article, however a couple good examples include:
General loading principles to abide by include:
A reasonable list of exercises (from basic to advanced) include: Two Leg Focused Exercises Hopping (forward/backwards, side to side, diagonals) Squat Jumps Burpees (with jump) Box Jumps Lateral Box Jump Overs (side to side) Hurdle Bounds Single Leg Focused Exercises Ski Hops Jumping Lunge Single Leg Hopping (forward/backwards, side to side, diagonals) Single Leg Hopping (through cones or agility ladder) Single Leg Hurdle Bounds Perfecting Your Technique During the early part of the ski season, spend the first few ski days working on your technique. Perhaps some pointers from your friends or a ski instructor would be helpful? As you scroll up and review the possible injury mechanisms, remember that strength and, more importantly, technique are to blame for most ski injuries. Pre-Season Stoke Now is the time to make a game plan. If you are excited for ski season, let this fuel your training! Any level of commitment to pre-season strengthening is better than nothing! The ideal goal would be to get into the gym 3 times a week for strength training, but start with whatever you can commit to. If you currently have pain, and aren't sure where to start, make an appointment with a physiotherapist or sports medicine physician. See you out there! References 1) Bere, T., Flørenes, T. W., Krosshaug, T., Nordsletten, L., & Bahr, R. (2011). Events leading to anterior cruciate ligament injury in World Cup Alpine Skiing: a systematic video analysis of 20 cases. Br J Sports Med, bjsports-2011.
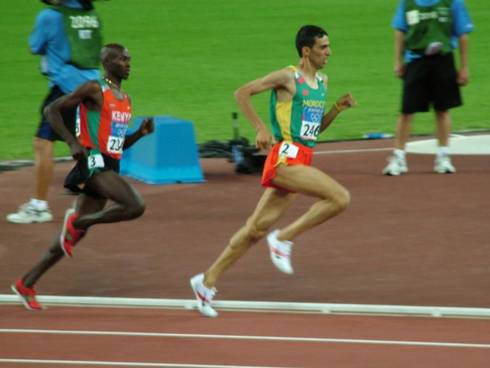
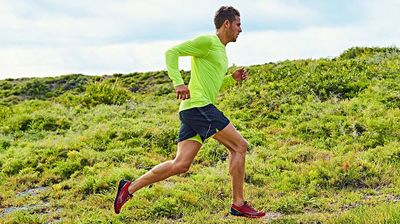
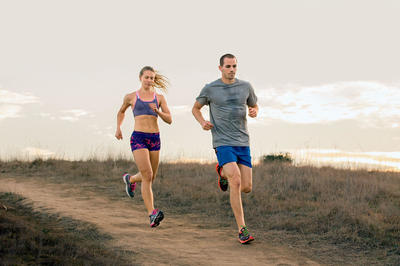
2) Bere, T., Mok, K. M., Koga, H., Krosshaug, T., Nordsletten, L., & Bahr, R. (2013). Kinematics of anterior cruciate ligament ruptures in World Cup alpine skiing: 2 case reports of the slip-catch mechanism. The American journal of sports medicine, 41(5), 1067-1073. Consistent Training Leads to Skilled Running Most athletes will attest that consistency is the most important aspect in progressing fitness and skill through training. This is why injuries set you back from reaching your full potential, or at least reaching goals in a timely fashion. While running, there are many things we can do to prevent injuries and some of them require very little time to implement, although learning the most effective way to implement them is individualized and may take years to achieve personal efficiency. Indeed, running is a skill, and it takes a long time to learn how to use your body in the most effective way. With a good training plan you will improve your efficiency, which will reduce physical and mental fatigue, reduce injury risk, and ultimately improve your performance! If you are new to running, or are simply wanting to improve, try these movement tweaks the next time you head out the door. N.B . These tweaks are good guidelines, but if you have a preexisting dysfunction (remember a dysfunction may not present with pain or any other symptom), you may benefit from a personalized approach. If you fall into this group, book in for a running assessment or seek guidance from a running coach, or rehab professional with post-graduate training in running assessments. It's Much More Than One Foot in Front of The Other 1) Upright posture. "Be tall!" At the start of your run, and periodically during your run, remind yourself to be tall. Think about elongating your entire spinal column; That is... if you had a string attached to the top of your head that connects down through the middle of your body, think about pulling that string up! You should not dramatically change your spinal curve with this, but you should feel that you are slightly taller. Why? When done appropriately, this helps to engage your multifidus muscles (spinal stabilizers), and make you aware of your core. This will help prevent energy loss due to poor stability, and will better allow you to apply force through your hips - helping to propel you forwards. It also helps with diaphragmatic activation and reduces the amount of airway resistance during breathing. PS - it might be a good idea to start thinking about upright posture during the rest of your day, as we spend thousands of hours hunched over at work and at home each year, and BELIEVE IT OR NOT!, this affects our athletic performance! 2) Forward lean from the feet / ankles "Lean forward from the ankles!" Running should be efficient. Leaning forward from the ankles aids in this efficiency, because it moves your center of mass slightly forward, and allows you to fall into your next stride. Don't forget #1 - it is too easy to let your forward lean come from hinging at the hips - "Stay Tall", and keep your head up, as you need to be looking forward! 3) Posterior-chain propulsion "Push, don't pull!" If we lean forward from the ankles, we will fall forward and must flex our hip joint and extend our knee to "catch" us from falling on our face. We can use this forward energy most effectively by pushing ourselves forward, as soon as our foot hits the ground. Try to see if you can feel yourself pushing forward using your glutes, hamstrings and calves. 4) Shortened stride and increased cadence "Shorten your stride and increase your cadence!" "Imagine that you are a ball, and as you are rolling over the ground, you are attempting to touch as many different places on the ground as possible" Most research suggests that elite runners who stay injury-free run with a cadence between 160-190 BPM. In most runners this improves multiple metrics (decreased "breaking phase", decreased vertical oscillation, decreased need for force absorption), and ultimately it decreases the amount of wear and tear / abuse placed on joints and muscles. In addition, it is said to improve efficiency in the long-term after the athlete adjusts to running in this way. The best place for our foot to land is directly under our center of mass because it minimizes the "breaking phase". The breaking phase is best described as wasted energy in the time between the foot striking the ground, and the push off phase when we propel ourself forwards. To ensure that we land with a vertical tibia - it is crucial to having a high cadence and a shortened stride. 5) Land with your foot under your center of mass "Most often, you should land using a midfoot strike" The jury is still out on what the best type of foot strike looks like in endurance athletes, but here is what we do know: A) A midfoot strike is mostly likely to place the foot under your center of mass while running on flat ground. B) Landing with a forefoot strike lends to a 2.6 times decrease in injury risk compared to rearfoot strikers (1). C) Landing on the forefoot or midfoot places more stress on the foot musculature and Achilles tendon. Landing on the rearfoot places more compressive loading forces at the tibiofemoral and patellofemoral joints of the knee. C) Rearfoot strikers tend to land with their foot in front of the body, which leads to have a longer stride and greater vertical loading (increased forces applied to the body) (2). D) Wearing shoes with larger heels lends to heel striking, whereas taking shoes off leads to landing on the forefoot or midfoot, with the strike being closer to the body. As always, we are reminded that science has limitations and common sense prevails, therefore do what feels right... BUT my recommendation would be to run on variable terrain, AND: A) As you run uphill, strike with your forefoot or midfoot. B) As you run the flats, strike mostly with your midfoot. C) As you run downhill, midfoot or heel strike may be best. Concluding Remarks These are but a few ways to immediately change your running form, in an effort to improve efficiency and promote injury-free training. General recommendations are terrible because they assume that all people are alike, so make no mistake - it is probably best to have a running assessment done to determine whether you truly need to change your running form. Nevertheless, exposing yourself to learn different styles of running will grow your running skill-sets and your body's durability, ultimately making you a better athlete! References 1) Daoud, Adam I., et al. "Foot strike and injury rates in endurance runners: a retrospective study." Med Sci Sports Exerc 44.7 (2012): 1325-34.
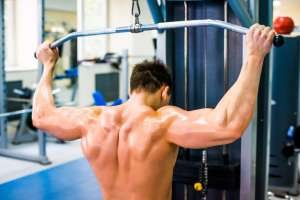
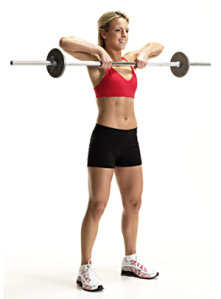
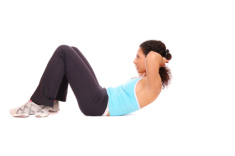
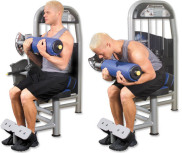
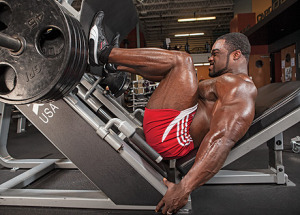
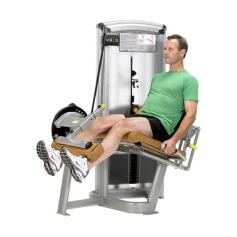
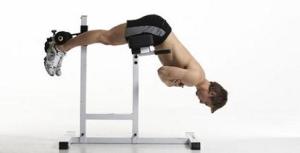
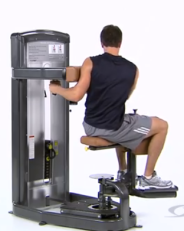
2) Williams III, Dorsey S., Irene S. McClay, and Kurt T. Manal. "Lower extremity mechanics in runners with a converted forefoot strike pattern." Journal of Applied Biomechanics 16.2 (2000): 210-218. When it comes to exercising, there are a lot of choices to be made; How often do I work out? Which body parts should I exercise? How much cardio, core, stretching, etc.. etc.. should I do? How many sets/reps/minutes? The list goes on and on… I’m about to make the exercise selection part of your workout a bit easier. The following list describes 7 exercises that are best left OUT of your work out. Read and enjoy! If you have any comments or questions feel free to leave them in the comment section or contact me personally! 1) Behind The Head Lat Pull Down This is a great exercise to focus on mid and lower trap development as well as general lat development. You’ll see some of the strongest body builders in the gym doing it, and I only hope that they know it may be harming their neck and shoulders. Because of the head forward (neck protraction) position, you are likely to see muscles like the sternocleidomastoid (SCM), levator scapulae, and upper fibers of the trapezius (traps) tighten up. These muscles are common sources of neck pain, reducing functional neck range of motion, as well as encouraging scapular downward rotation, which can create or further exacerbate shoulder dysfunctions. Additionally, the position of extreme horizontal abduction and external rotation of the shoulder can cause a host of problems that are not limited to shoulder impingement syndrome, rotator cuff strains, labral irritation/tears, AC Joint compression, and ligamentous laxity. 2) Upright Row The upright row focuses on strengthening the middle and posterior delts, rhomboids and upper traps. It can certainly achieve this goal, however it comes with the risk of shoulder impingement. I personally do not recommend this exercise to many people, but if I do it is always with the limitation of not bringing the elbows up above the shoulder level (as seen in the above picture). 3) Traditional Sit-ups, Crunches and Machines that Simulate Sit-ups Stuart McGill would die and then roll over in his grave if I didn’t mention these exercises. Essentially, yes, these exercises can pack on some muscle and definition to the rectus abdominua, iliopsoas, rectus femoris, and the obliques… However to include these exercises in a regular exercise program is not worth the risk of injury. Going back to basics for a moment- the core is essentially meant to create spinal stability. Another way for me to say this is that the core musculature is meant to functionally operate as an anti-mover for the spine, contracting isometrically. When you do a sit-up you are concentrically contracting the anterior core muscles. Additionally, Stu McGill’s research shows that each intervertebral disc in the lumbar spine has a finite number of spine bends (flexion) that it can tolerate. Due to the structure of the discs, repeated flexion (think rounding the back) is one of the worst motions for lumbar spine health. Crunches, sit-ups, and most abdominal machines in the gym FLEX the spine! So ..stop it!.. and stick to planks, and other exercises that keep the back in a neutral stable position. 4) Leg Press I love the fact that you can really load up this machine and focus on leg strength, however there are three main flaws I see to using it: 1) The back and feet are planted and impacts the proper knee arthrokinematics (the movement of the joint surfaces) of the tibiofemoral joint to take place. Typically as you straighten the knee, there is a conjunction external rotation of the tibia on the femur. It is hypothesized that this machine will affect this conjunct movement. 2) The back is flexed and thus it experiences high levels of stress placed on the discs (especially at the lumbosacral junction). 3) The exercise does not have a lot of functional carry-over to sport or daily life – Have you ever known anyone to sit down and push 400 lbs of weight? My recommendation – Train functionally in an upright position! 5) Knee Extensions This machine is great for building quad mass, but is not great for the: 1) Patellofemoral Joint Arthrokinematics: (A) The way that the patella (knee cap) moves on the femoral condyles changes depending on whether you are performing an open or closed-chain exercise. Powers et al. (2003) found that the patellofemoral joint kinematics during non-weight-bearing (open chain) exercises could be characterized as the patella moving on the femur, while the kinematics during weight-bearing (closed chain) exercises could be characterized as the femur rotating underneath the stable. The latter of the two conditions provides the least amount of stress placed on the patellofemoral joint. (B) There is often additional stress placed on the patellofemoral joint because the load that you must push with your shin is anterior to the knee joint, whereas during a squat, the load is often through the knee joint or posterior to the knee joint. 2) Tibiofemoral Joint Arthrokinematics: For the same reason as explained in the leg press example above (#1), pushing your shin against the machine prevents some of the conjunct external rotation of the tibia on the femur, meaning that the joint mechanics may be dysfunctional and can lead to joint damage. 6) Back Extensions This may be a good exercise to put on some erector spinal bulk, but over facilitation of this muscle group is already a common occurrence. Classically this facilitation occurs because of poor spinal stability via inhibited/weak deep core muscles (most significant = the multifidus muscles in this scenario). Performing this exercise may result in increased facilitation of the already facilitated erector spinae muscles. 7) Almost All Seated Exercises Avoid almost all seated exercises, and especially ones that cause repeated lumbar rotation. The worst ones to avoid include exercises like the seated torso rotation machine, or any machines that force you into lumbar flexion (as mentioned above in #3). Remember Stuart McGills advice from above? The lumbar spine should be able to move dynamically, but have static stability when loaded. What i mean by this is that when the spine is not under any stress, we should have full range of motion through flexion, extension, rotation and side flexion. However, when loaded, the core muscles should provide stability and should remain static. If the spine moves when it is under load, additional shear and compression forces will occur, resulting in wear-and-tear on the spine. Lastly, when we must engage other muscle groups from a seated postion, we do not harness the stability and strength of the core. As a result we likely are weaker in that exercise, and we could be placing our body at risk for injury. Why? Because most sitting inhibits our ability to contract some of our core muscles (i.e. when sitting, the anterior abdominal cavity is compressed which inhibits the diaphragm from contracting), and some of our peri-core muscles (i.e. the glutes, hamstrings multifidi, erector spinae, etc. are lengthened and thus unable to contract as forcefully from the seated position). Concluding Remarks This is an interesting take on mobility that has helped me greatly: Always think about the body in terms of what should be mobile or stable. The following list will help to provide you with an understanding, and if applied correctly will help guide your training and any injury rehabilitation: Ankle — Mobile Knee — Stable Hip — Mobile Lumbar Spine — Stable Thoracic Spine — Mobile Scapula — Stable Glenohumeral — Mobile Remember that each joint should have full ROM regardless of its main purpose. Read more about this approach from Gray Cook’s book, 'Movement', ReferencesPowers, C.M., Ward, S.R., Fredericson, M., Guillet, M., Shellock, F.G. (2003). Patellofemoral kinematics during weight-bearing and non-weight-bearing knee extension in persons with lateral subluxation of the patella: a preliminary study. Journal of Orthopaedic and Sports Physical Therapy: 33(11): 677 – 685.
|
Have you found these article to be informative, helpful, or enjoyable to read? If so, please visit my Facebook page by clicking HERE, or click the Like button below to be alerted of all new articles!
Author
Jacob Carter lives and works in Canmore, Alberta. He combines research evidence with clinical expertise to educate other healthcare professionals, athletes, and the general public on a variety of health topics. Archives
November 2022
Categories
All
|
|
|






 RSS Feed